How to be sure you’re training hard enough

Are you training hard enough?

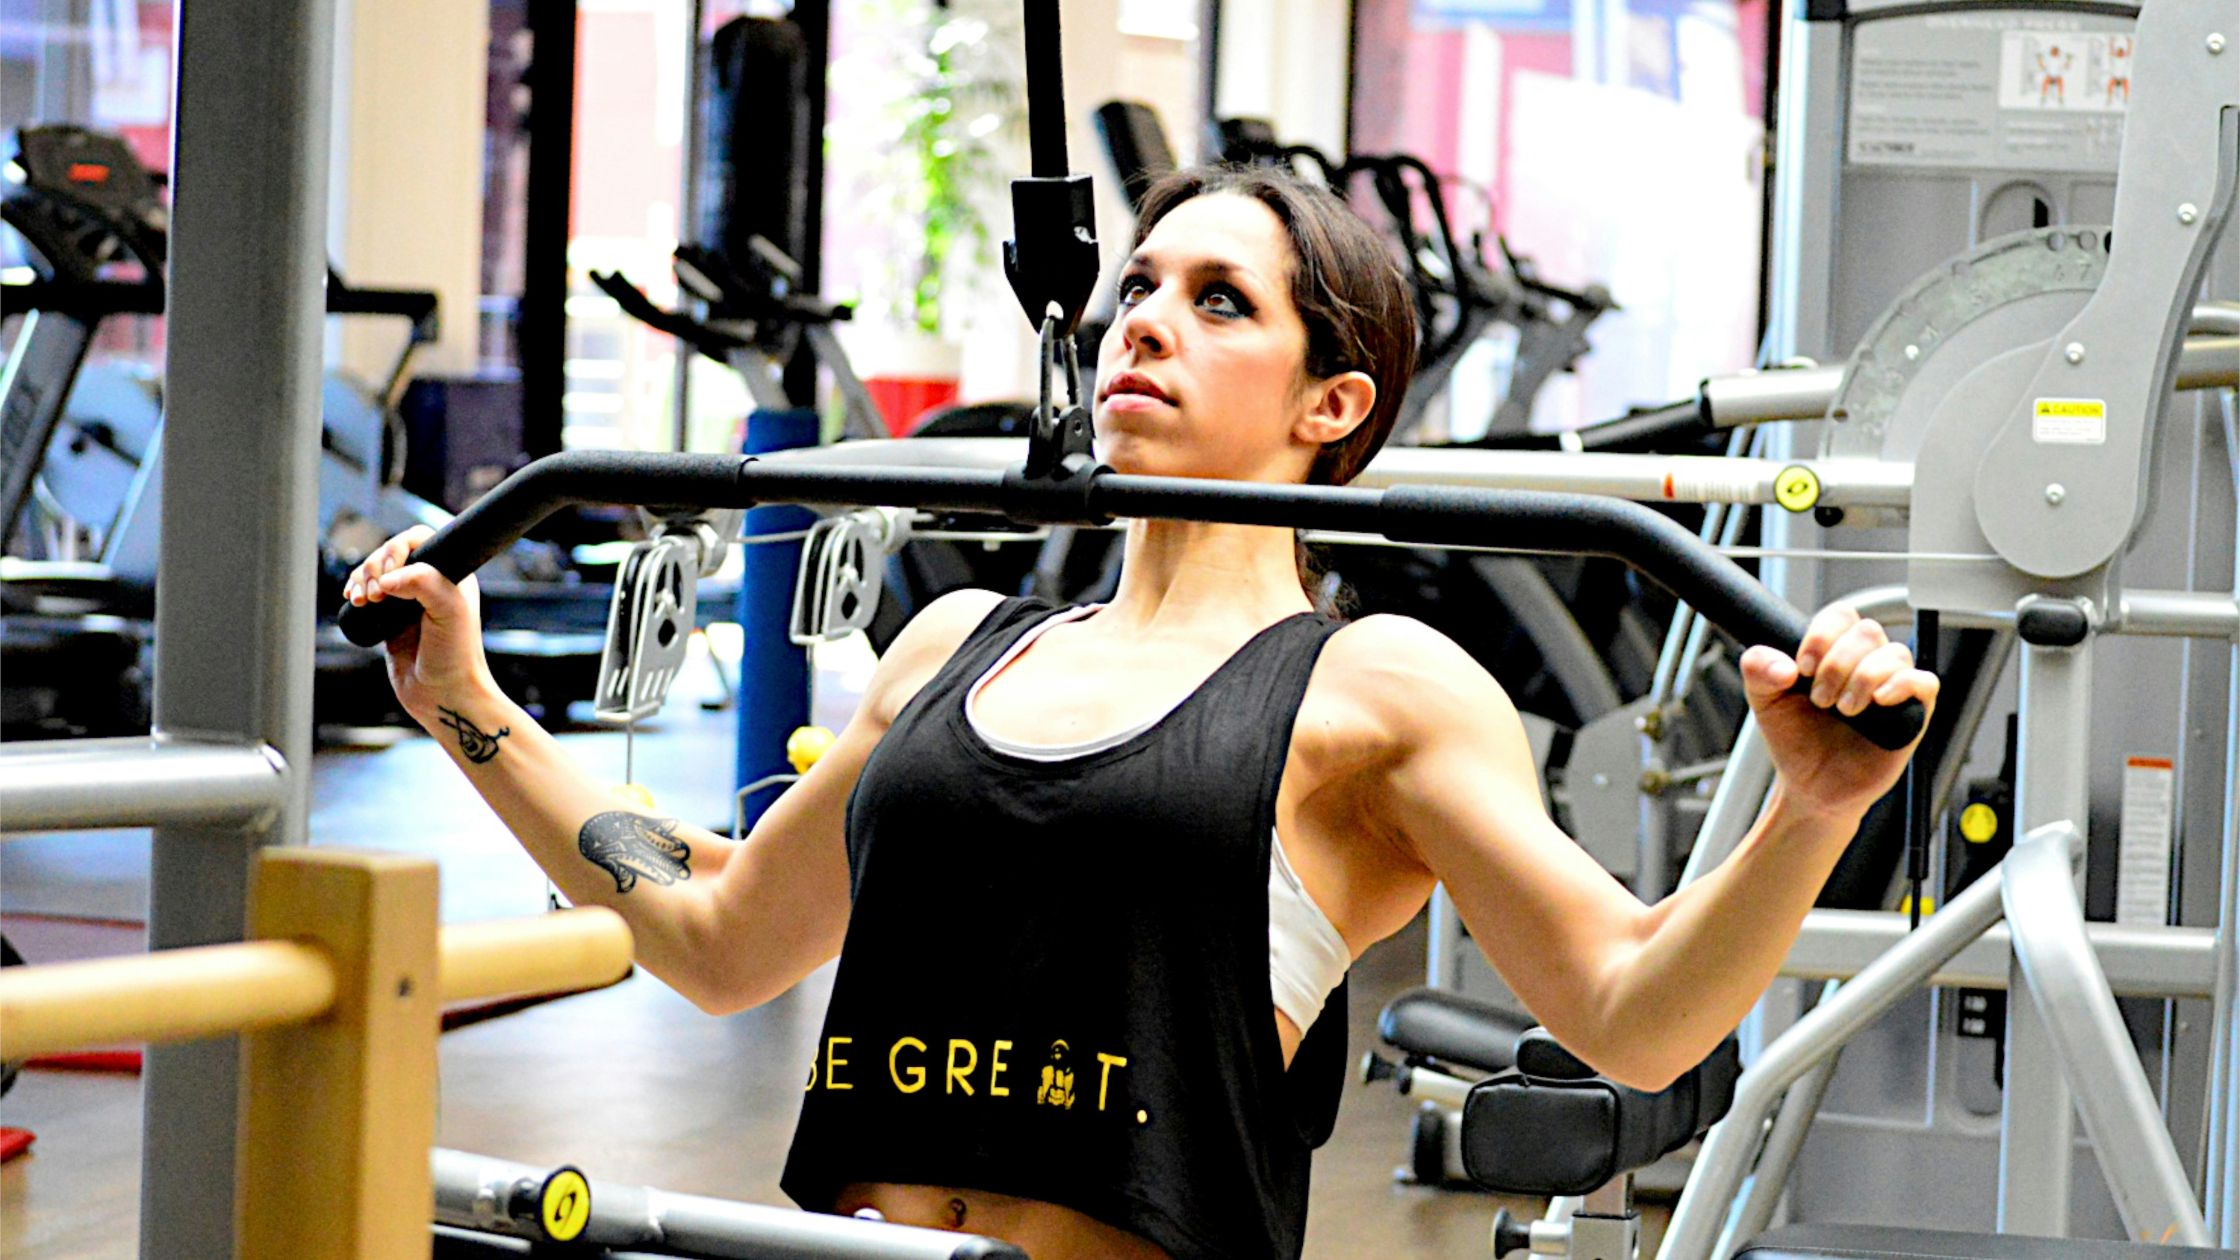
We all exercise or train to become better versions of ourselves but we don’t always know how to get better. Years of experience in the gym and other training environments have shown that many people exercise, but most don’t do enough to get real results.  Exercise and training are there to push your body past limits so that it can adapt to the load, making you physically and psychologically stronger and fitter. However, there is also a chance of doing too much.

There are three main variables you can change to dial in your training to get fitter, stronger, or bigger.
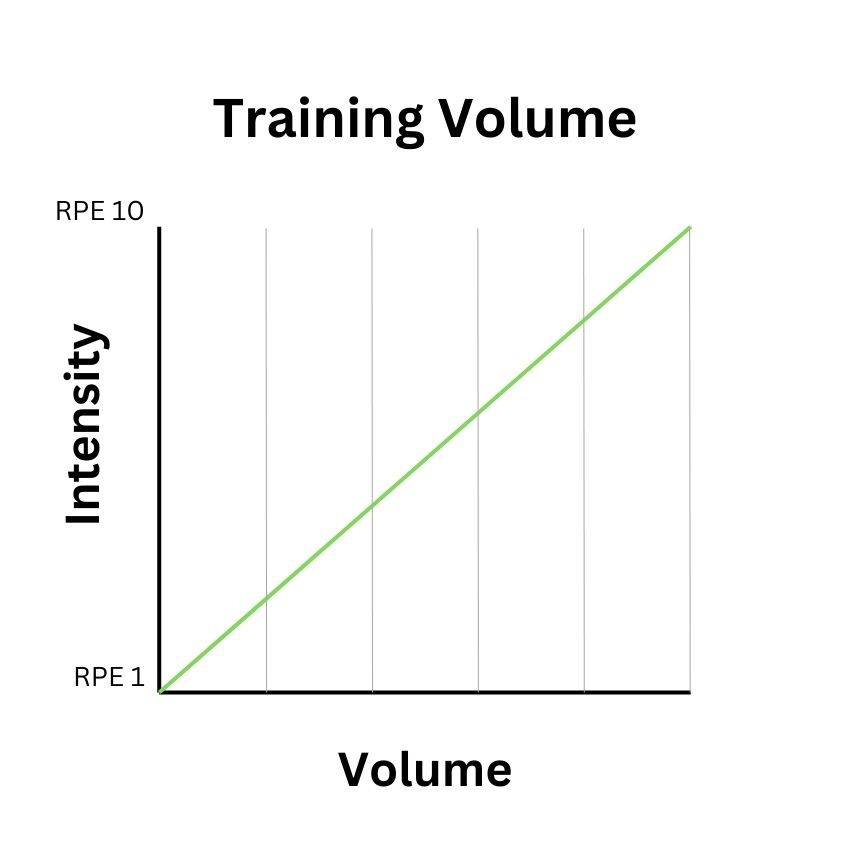
Training volume

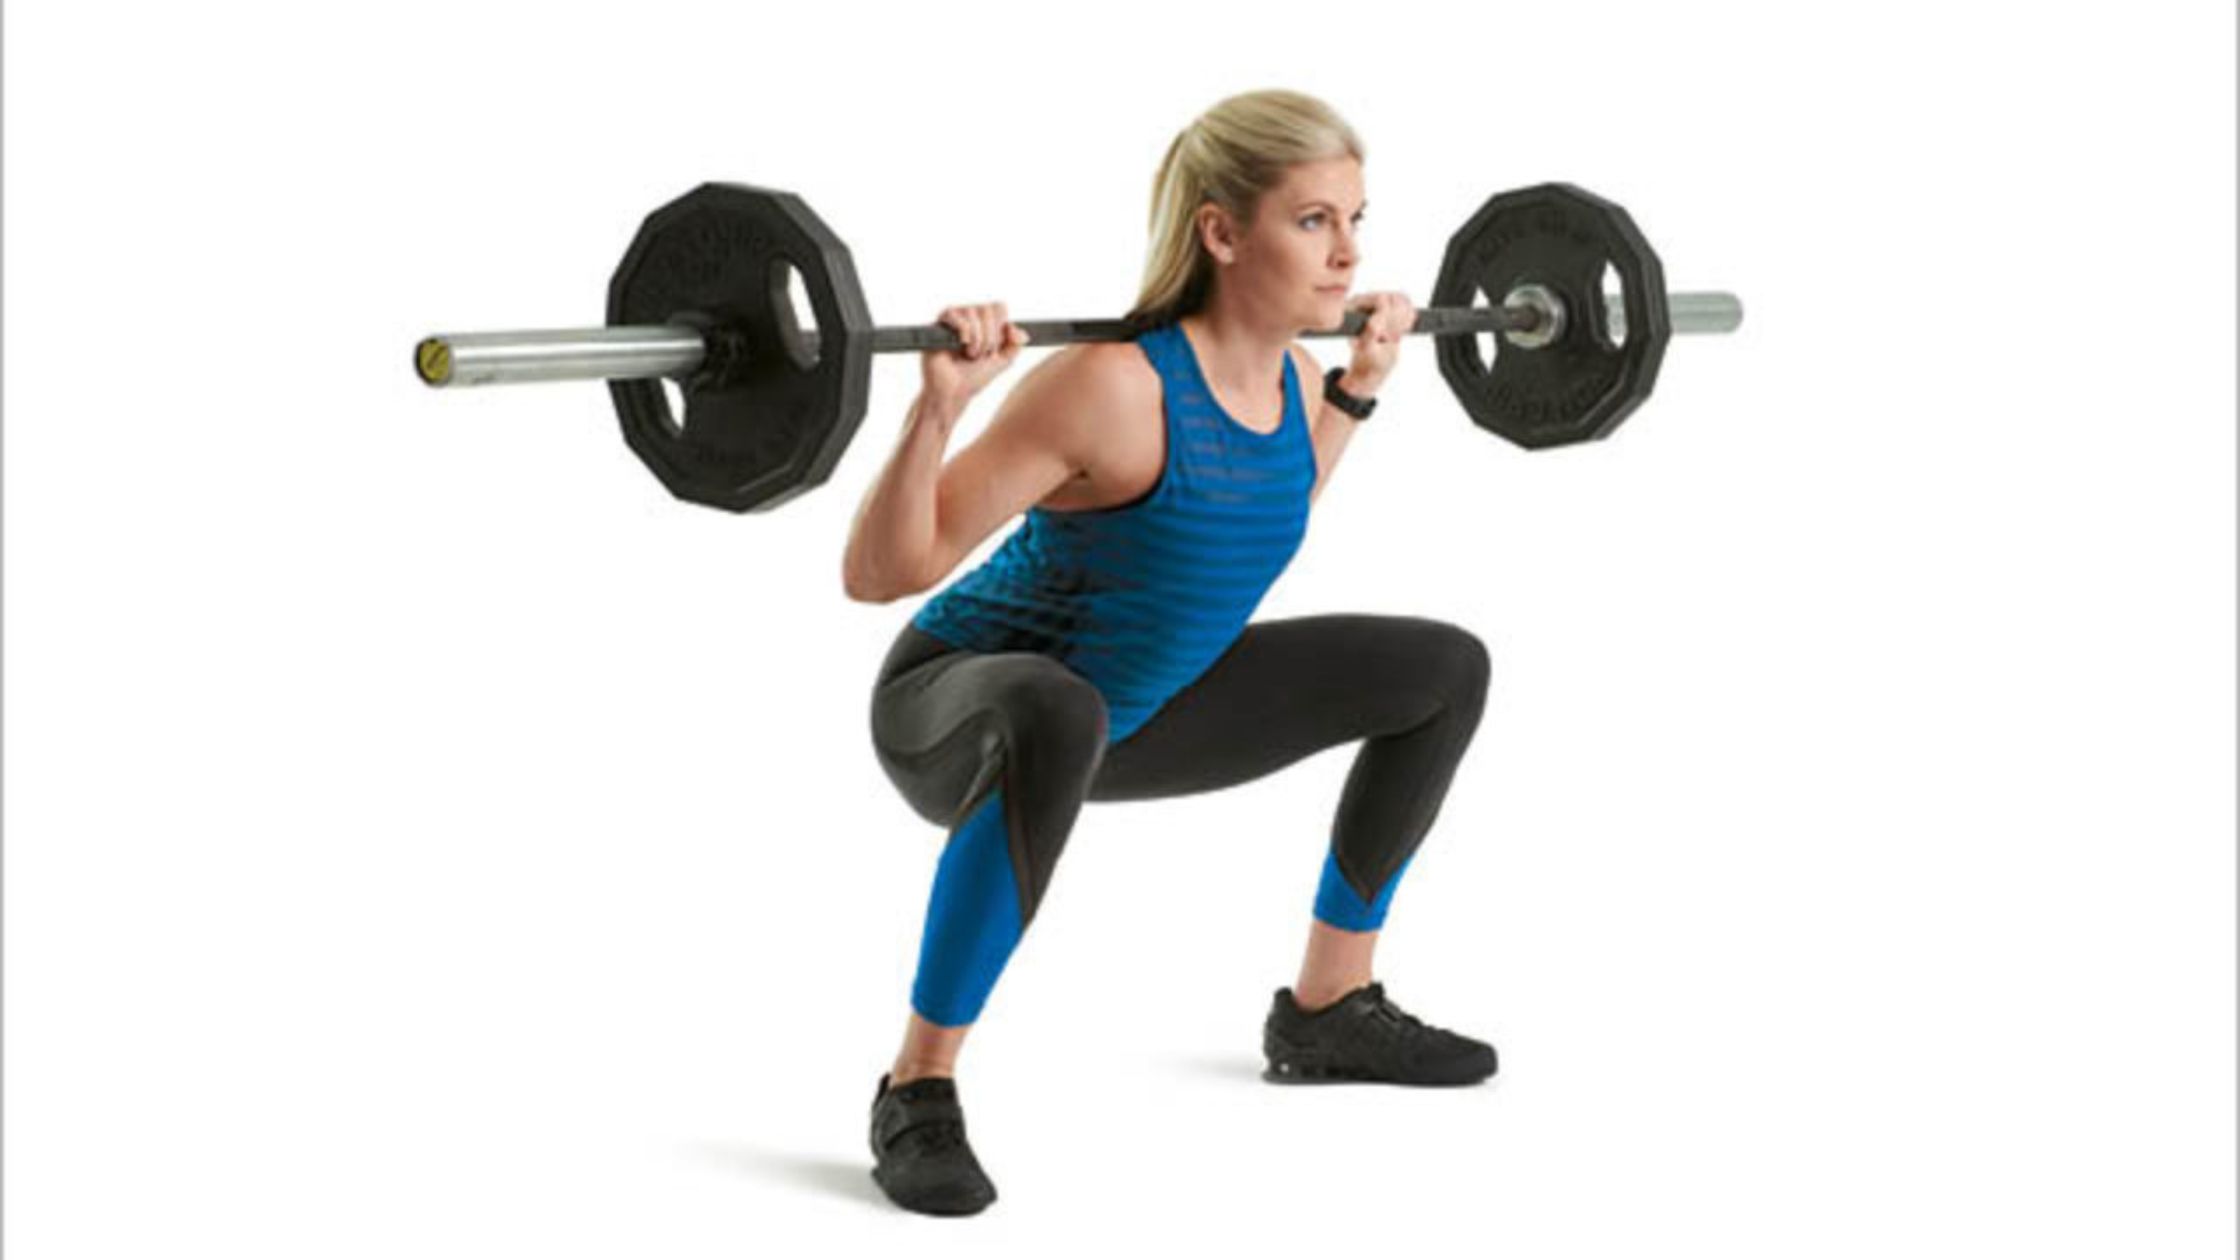
Volume is often inaccurately described as the duration of the training, however, it’s the quantity of activity performed during training. “It is the primary component of training because it’s a prerequisite for high technical, tactical, and physical achievement.” (Periodization, T.O. Bompa & G.G. Haff). The specifics of the volume will always depend on the sport or activity. For endurance athletes, the main component measured is the distance covered. Resistance training and weightlifting will measure the accumulative weight lifted during a workout (Volume Load = sets x reps x load in kg).

Training Volume graph
Training Volume

How can you increase training volume?

  • If you’re an endurance athlete work on increasing the distance covered per run or week.
  • Each week, try to add an extra rep or two to each set.
  • If you are building more capacity, add another full working set to the exercise.

To add volume, you’ll be adding distance, sets, and reps to the workout. Doing a higher volume workout will impact your recovery time between workouts.
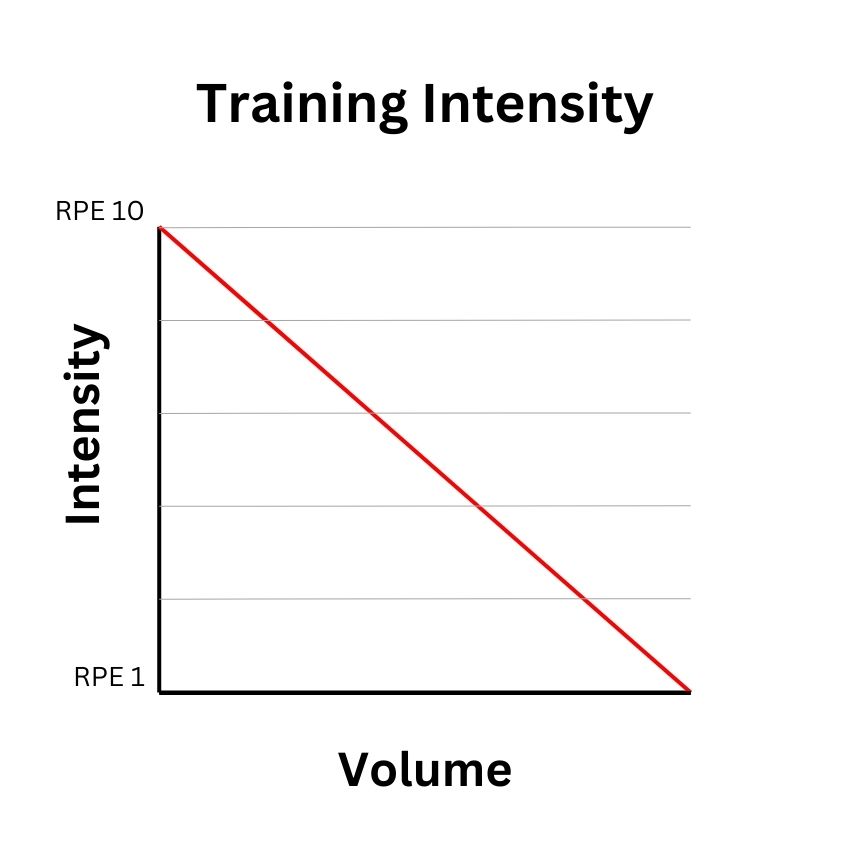
Training Intensity

Where volume is the quantity of work during training, intensity can be seen as the quality of work being done. With relation to resistance training, intensity can be seen as the energy expenditure or work per unit of time. i.e. workout). The more work you do during a workout, the higher the intensity and fatigue accumulated. However, intensity also has a psychological component whereby your ability to handle and overcome mental challenges during a tough workout or training segment.

intensity is measured differently between sports and activities. Endurance athletes will look at average heart rate as they run, cycle, or row. Maximum heart rate will also be used during resistance training but power output will become increasingly important.

Training Intensity graph
Training Intensity

There are two easy-to-follow methods of assessing intensity when training.

REP (Rate of perceived exertion)

Training hard is very relative and you need to find your “sweet spot” for training. Each level of RPE is a guide for progression. Each intensity zone has its uses whether you’re training for endurance or weight training.

RPE Scale:

  • 1-4: This is where you’ll be warming up. You’ll either be jogging very slowly or doing mobility exercises, getting a light sweat.
  • 5-6: The warm-up and speed set intensity. Low intensity and moderate weights that slightly work the muscles to prepare for main activities or work on explosiveness. Endurance athletes will be able to chat but with laboured breathing.
  • 7-8: This is your working capacity. You’ll be doing your working strength sets or running but with shortness of breath and talking in short sentences.
  • 9: Pushing hard and barely able to maintain the intensity of the exercise. Reps are slowing down and form is becoming worse—barely anything left in the tank.
  • 10: You’ve pushed so hard that there is no way you can do another rep. Systemic and muscular failure happens here. Not recommended too often.

While RPE is great for endurance athletes, it can split those doing resistance training. RPE is perfect for powerlifters who work according to their maximal efforts. They tend to work with lower weights at higher intensity.

RIR: Reps in Reserve

If you want to build muscle, you could use the RIR method for your workouts. These are the reps in reserve for each set. It can be tricky to figure out, but so does the RPE scale. The more you use it, the better you’ll get.

You don’t want to start a new training block too heavy, so training each set to about 3 RIR is a good start (this could change in the final set). By adding weight each week, your reps in reserve will decrease and you’ll progressively get stronger.

Ways of altering intensity:

  • Increasing the speed over time or quickness of a specific exercise. E.g. running faster
  • Increase the weight lifted for an exercise.
  • Decreasing rest times between sets and exercises.
  • Performing endurance, interval, and tactical exercises at a higher % of maximal heart rate.
  • Have more intense training weeks before adding a deload week as part of a training block. E.g. 3;1 block to 4:1 training block.

Training Density

Training density is going to involve how often you’re training. The frequency of your workouts will depend on your training intensity and your recovery. If you’re recovering long before the next workout, you might consider adding another workout to your week. However, depending on your goals and program, increasing training frequency will look different to somebody else.

How to adjust training density:

  • If your muscles recover a few days before the next workout, adding another workout for that muscle group could improve adaptation. E.g. Training legs 2-3 times a week instead of once.
  • Have more speed sessions or longer runs during the week if you’re an endurance or track athlete.

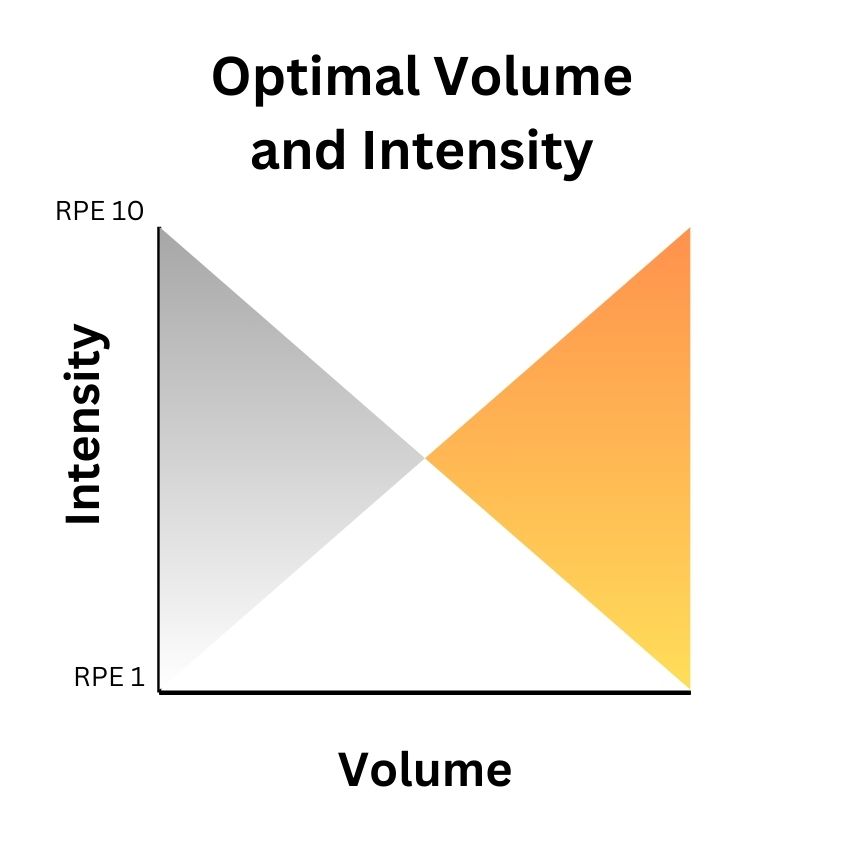
Relationship between Volume and Intensity

There is a trade-off between volume and intensity. You can add all of the reps and sets you want, but it will impact how heavy you can load the bar. You can also run far but you won’t be running as fast as possible.

Optimal Volume and Intensity

If you’re building muscle, you will be adding loads of sets and reps to your workout to stimulate muscle growth, but you won’t be training very heavily. If you’re training for strength, your reps will be lower, rest times longer but the weight will be much heavier. You want to find the perfect zone for your specific goals.

There is no special variation that suits everybody, which is why well-planned programs make such a big difference.

Avoidable Volume and Intensity

There are two more scenarios that you don’t want to find yourself in. These are often determined by no training plan, trying to follow elite athlete intensity, or being unable to train very hard.

You’ve got the group who often starts too heavy, always trains to failure and ego lifts with way too much weight on the bar. They load the intensity and increase the volume so much that they’re sore for a week, train with a sub-optimal range of motion, and increase the risk of injury.  This approach can also lead to overtraining.

The second group is often the beginners. They are unsure how to train effectively and/or worry about injury or muscle growth way too much. Unfortunately, this is also the zone, where for most of history, women were told to train because otherwise they’ll get bulky. This group of individuals exercise, but not hard enough to make any gains or they get them very slowly.

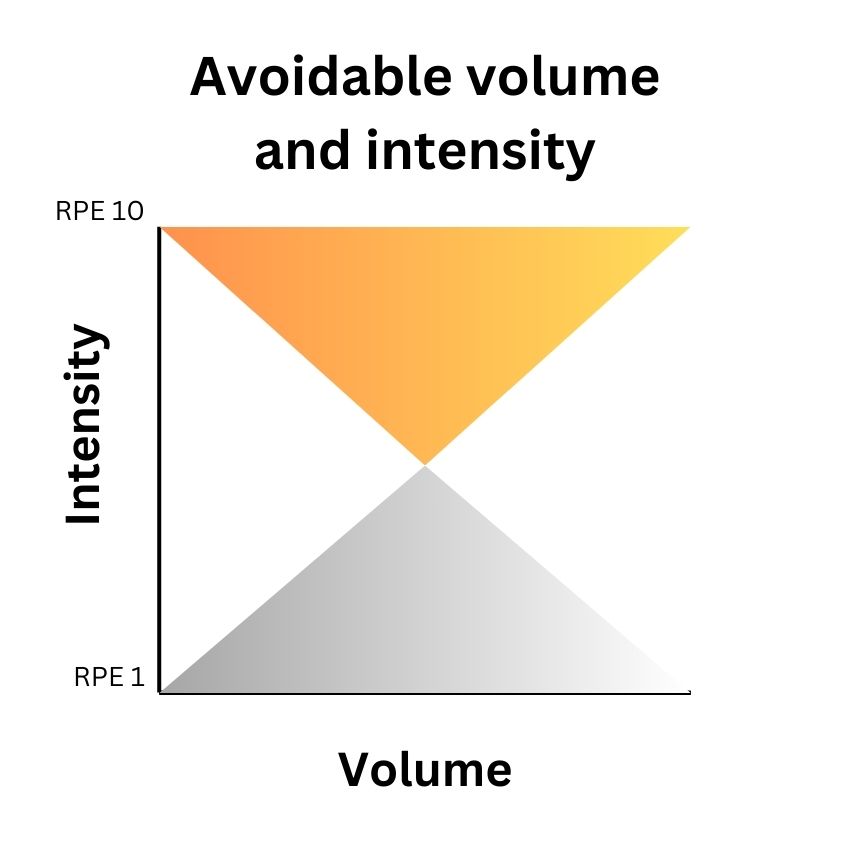
These two scenarios are avoidable because they’re quite easy to fix with correct education and programming.

Final Thoughts

Understanding the relationship between volume, intensity, and density can help you make those gains you want so much. You want to train hard and often enough to stimulate your muscles and nervous system but not so hard that you get hurt. You also want to ensure that you’re doing exercise at a high enough volume and intensity to make any gains at all.

These variables are changeable for the individual and individual goals, so take the time to learn and enjoy the process of getting fitter and stronger.  

Written by Gary Dunn a.k.a. @geekphysique_za

Can’t find a deadlift bar? Try these 10 alternatives

Conventional Deadlift

Deadlifts are often acknowledged as one of the primary lifts for strength or hamstring, glute, and back development. Being able to lift a heavy load off the floor is also one of the ultimate tests of strength, but what if there are no barbells available or you want to change things up for a while due to an injury or general training plateau? It’s great to change things up once in a while and if you’re set on doing a deadlift-style exercise, there are various options for you.

Conventional deadlift

First, let’s consider the conventional deadlift form. Even though cues will vary depending on the coach and individual, there are some basics to remember:

  1. Feet: Hip width apart and toes pointing almost straight forward.
  2. Shins: The Bar should be just over the midfoot and when grabbing the bar, should be pulled against the shins.
  3. Grip: Hands should be just wider than the feet at shoulder width. (Knees and thighs should push against the inside of the arms)
  4. Back:  Lock your back in slight extension (lumbar and thoracic).
  5. Brace: Breathe into your abdomen and push your stomach, obliques, and back outward as if you’re about to get punched in the gut. If you have a belt, all sides should feel pressure.
  6. Shoulders: “Set” the shoulders and position the shoulder joint right over the hands.
  7. Shoulders > Hips > Knees: Shoulders are higher than the hips and the hips are higher than the knees.
  8. Drive through the feet and push your hips towards the bar as you pull it off of the floor. (Hips should not rise above the shoulders early).

The deadlift is a full-body exercise but it does emphasise the hamstrings, glutes, and erector spinae muscles of the back. Accessory muscles will include the quads and upper back muscles.

Non-barbell deadlift alternatives (heavy)

Trap bar deadlifts

What if you can’t find a barbell for deadlifts or you just want an alternative for a new training block? There are some non-barbell alternatives when you still want to lift heavier weights with a similar form pattern to conventional deadlifts. However, not all gyms will have these pieces of equipment.

Belt squat machine deadlifts:

Another piece of specialized equipment that has become more popular. Grab a wide-grip lat pulldown handle and attach it in place of the belt. This deadlift variation will often work similarly to the deficit deadlift due to the depth possible with most brands. You’ll also be able to have constant tension at a greater range of motion before reaching the bottom.

Just doing belt squats are also a great alternative for building leg size and strength, especially if you can’t overload your spine with a heavy barbell.

Non-barbell deadlift alternatives (light):

What if you want some of the benefits of deadlifts without needing to lift heavy? These alternatives are great for the general gym-goer, those with injuries, or if you just want a movement-specific warm-up before doing heavy deadlifts.

Kettlebell or Dumbbell deadlift

For many, the barbells are often in an area of the gym they want to avoid or they don’t have a barbell at home. Some people also just started training, so want an accessible piece of equipment to do lots of reps with. You can use either a narrower stance with the weights by your side for more quad engagement similar to a trap bar or have a wider (sumo) stance with the weight in front for more glute activation. This variation is also great for getting a full range of motion similar to creating a deficit.

Credit: Onnit

Single-leg deadlift

If you’re training at home with lighter weights or want to target your hamstrings and glutes even more, single-leg deadlifts are great. By focusing on one leg at a time, you can use less weight and target one leg more effectively. This variation is also great for learning to keep your hips more stable as you hinge forward.

Don’t be afraid to lightly hold onto something for balance because you want to target the muscles and not worry about falling over.

Bulgarian split-squats

Everybody’s favourite exercise is here, right? Not only is this a perfect exercise for developing the legs, but it can also help you with improving other exercises. Even with lighter weights, Bulgarian split squats can make the legs work very hard, but it is important to work past the discomfort. If you use a full range of motion, you’ll work the entire posterior chain as well as the quads in front.

The leg drive on the front leg helps you activate as many muscles as possible while also improving the strength and mobility of the hip flexors on the back leg.

It’s also great as a warm-up or potentiation exercise for a heavy deadlift workout.

Credit: Squat University

Non-conventional deadlift with barbell

What if you had a barbell but you wanted to change things up a little bit? The conventional deadlift is great but people often have “sticking points” in different areas of the lift or just want to directly target different muscles.

Sumo deadlift

The step-child of all deadlift variations, the sumo deadlift is still top of many lists. It is also allowed in most powerlifting federations. But, why would you want to try out this variation?

Due to the wider stance, you are using even more of your hamstrings and glutes to lift the weight. If perfected, you could lift more weight than you would doing a conventional lift. There are some pros and cons though:

  • Even though you’re targeting the posterior chain even more, the range of motion is reduced, meaning that muscle growth is hindered. A fuller range of motion has been scientifically shown to provide more muscle growth.
  • It’s useful for lifters with long femurs (thighs).
  • Potentially more reps at heavier weights.
  • Most people in the gym will judge you for lifting sumo.

Stiff-leg deadlift

Do you want to target your hamstrings even more? As we know, muscles get their best growth stimulus in the lengthened position. Doing stiff-leg deadlifts or Romanian deadlifts (RDLs) are a great way to target the hamstrings. However, stiff-leg deadlifts are better for power generation than they are for pure muscle growth.

With this variation, the exercise starts from the floor like a regular deadlift. You want to have your knees bent very slightly but your hips high and your shoulders ahead of the bar. Hips should still be pushed as far back as possible with the hamstrings stretched. Generate power from the floor, but keep the bar close to your body and hinge at your hips instead of the knees. Remember, you won’t be lifting very heavy and the slow essentric (lowering phase) should still be slow and controlled with shoulders pulled back and chest open.

Romanian deadlift

The technique is almost exactly like the stiff-leg deadlift but the movement starts at the locked-out position. Hinge at the hips and lower the bar as slowly as possible with knees only slightly bending later on. Slow lowering phase and athletic pull back to the top but touching the floor isn’t the goal. Your hamstrings should feel almost all of the stretch and contraction with a slight pause at the bottom.

Credit: Squat University

Deficit deadlift

If your sticking point with the conventional deadlift is getting the initial pull from the floor, you could try adding a deficit. This is where you either stand on a small elevated platform or use smaller plates to get the bar lower.

Having the bar at a lower position forces you to have your hips lower, overload the initial pull position, activate more of your leg muscles like the quads and work past the difficult part of the movement.

Start with just about 5-10cm elevation like standing on some flat bumper plates.

Rack pulls/Box pulls

The opposite of deficit deadlifts, these are often used to help get past the knees. If you struggle to lock out your deadlift, have the bar on the safety pins of the power rack or boxes. The bar is usually just under the knees to help you lift more efficiently at the sticking point.

Where deficit deadlifts are usually lighter, rack pulls tend to work better at a heavier weight. You’ll be activating more of your hips, glutes, and back muscles here. The range of motion is very short, so it’s not advised for muscle building, but an accessory for power and deadlift strength.

Be aware, that dropping the bar in a rack will potentially be a bad idea for keeping your bar in good shape. Having the weight rest on boxes is a better idea. However, rack pulls will have no slack in the bar, and box pulls will, like a regular deadlift.

Which should you choose?

The deadlift might be one of the best tests of true strength but not everybody needs to lift anything near maximal weights. If you’re not competing in a sport that tests the deadlift directly or you just want to be as strong as possible, you don’t need to do them.

Any of the other variations like RDLs, kettlebell deadlifts, Bulgarian split squats, and others mentioned above are perfect for muscle building and still increasing strength. It will all depend on your goals and ability to perform the movement most effectively.

Written by Gary Dunn (@geekphysique_za)

Here are 5 unspoken gym rules for everybody

Re-racking weights and not training at the dumbbell rack

Some of us spend hours a day in the gym while others are starting their journeys through health and fitness. We are near many different people in a public setting that will help us live longer but, on the other end of the spectrum, the gym is a place full of uncomfortable situations. While every gym has the same rules, some important considerations aren’t on any list. Some of us might learn them for the first time as we grow in the gym while others need to know them for the tenth time.

Even though they’re not in most rule books, let’s speak about some unwritten gym rules:

5 Unwritten gym rules and etiquette you should follow

All about the dumbbell rack

All gyms have rules about packing weights back and putting the dumbbells in the assigned spaces, but there is another rule that should be followed.

Dumbbell racks are usually placed in front of big mirrors, making it the perfect spot to watch your gains. However, standing right at the rack causes many issues, mainly standing in the way of more people than you might think. Depending on your size, doing curls or dumbbell rows right on or at the rack puts you in the way of at least 2 to 3 sets of dumbbells while doing lateral raises eliminates even more weights for people to get a hold of.

Not only are you in the way of people who want to put away or pick up weights, but you’re taking up space between racks and benches where people often walk. Most people in the gym don’t have visual impairments either, so you don’t need to stand a meter away to see your gains.

Phone use

We all know that our phones are a major part of our lives. However, most people don’t have much time in their day, so sitting on your phone while hogging equipment is just unkind. We also know that gym programs are on our phones too and tracking workouts is important.

The gym is there for exercise and maybe some socializing, but if you’re socializing on your phone, you might be sitting on a bench or machine somebody is using.

There is a way to get around it if your phone takes up so much of your time. If somebody asks if you’re using something, let them share the equipment so nobody’s time is wasted.

Cameras

Our phones aren’t just for texting but we take photos of our workouts and gains to post on social media or send them to our coaches.

If your gym allows cameras, be respectful of others. You’re in a public place, so you don’t own the area you’re using or photographing. You should make sure you’re not facing the camera towards somebody who’s exercising and doesn’t get outraged when somebody walks in front of your camera. The space is for everybody and you should never make anybody feel uncomfortable in an already uncomfortable environment. You do not want to be harassing somebody, even unintentionally.

There are videos on social media of people calling out those staring at them or walking in front of their cameras as they exercise. There are also channels ridiculing them. The best course of action is to make this phenomenon as limited as possible.

If you don’t have a choice of camera angle or didn’t notice them before, ask permission to be included in the video, and that also counts when you ask a stranger to spot your bench, squat, or do any other exercise.

Hogging equipment

We’ve already spoken about people sitting on equipment while using their phones, but there are two more versions of hogging equipment.

An entire workout in the power rack: We all know that squats can take a while, especially when you’re going to be lifting heavy. If somebody asks how many sets you have left, offer to let them work with you, especially if you’re just getting started. You might even make a new gym buddy.

However, some use the power rack and run around doing other exercises around the gym too. Not only should it then be even more possible to let people share the rack, but it’s important to stay approachable and friendly in this case.

Using machines all around the gym: There are many parodies of this occurrence on social media. Somebody wants to use a machine and a shout from across the room says they’re using that while busy doing a completely different exercise. This is easier during quiet gym hours but at peak times, using two or more pieces of major equipment can be an inconvenience to multiple people.

Keep sharing equipment in the gym because there’s always a good reason to be kind.

Locker room etiquette

 The gym floor is already an uncomfortable space for people but the locker room can be ten times more painful.

  • We know the showers and getting dressed or undressed are what locker rooms are for, but walking around with appropriate clothing can make people feel uncomfortable.
  • Wipe down counters and other surfaces after use.
  • Wear appropriate clothing and cover up in communal areas.
  • Stay off your phone and refrain from any photography.

Why you should follow gym etiquette and these unspoken rules:

Safety: Re-racking weights and using equipment properly helps prevent accidents and injuries on the gym floor. Wiping up drips around the pool or locker room can prevent falls.

Hygiene: We all understand that gyms are the perfect zones for lots of germs, so wiping down equipment is crucial for personal health and well-being.

Respect: By respecting personal space, safety rules, and modesty rules, you show respect to your fellow gymgoers. This creates a more pleasant atmosphere for everyone.

The gym should inclusive and welcoming place where anyone, regardless of their experience or ability, should feel at home. People should be able to work toward their goals without fear, intimidation, or anxiety.

These rules and etiquette guidelines might not always be in gym manuals or on signs, but keep them in mind when you’re in the gym again.

Should you always keep your muscles guessing in your workouts?

Don't keep muscles guessing by always changing workouts

If you’re joining a gym, training group, or working out at home, the idea is usually to progress and get better. Some people will progress faster than others and those who don’t progress as quickly want to know how they can speed up the process. One of the myths you might hear is that you always need to keep your body or muscles guessing by doing different exercises each week and workout so that you don’t plateau or get bored. Unfortunately, that’s not how the body works and whether you’re a beginner or an advanced lifter, consistency is the best way to get results.

There are many ways you can write or follow programs to help you get your results but there’s just so much of it to sift through. Here are four simple tips on how you can keep progressing in your fitness journey without chopping and changing workouts and exercises each time.

Progressive overload

The term progressive overload means that you keep increasing the volume or intensity each week or workout so that you can make small improvements each time. This is the better way of keeping your muscles “guessing” or in this case, stimulated so that you keep improving. The slight increase in weight, reps, or sets with the addition of rest time manipulation can stimulate your muscles to keep progressing.

Well-written programs with progressive overload are easy to track because you’ve got specific variables that are changing, so you know when you’re getting stronger, faster, or fitter. You want to keep a consistent stimulus between periods of recovery while tracking the improvements.

For example: If you keep changing your exercises for leg day, you can’t keep progressively overloading your muscles because you keep starting from scratch by doing a different exercise. Without a plan on how to progress those important volume and intensity variables, you’ll find it difficult to improve.

Training cycles

Now that we know you need a good program, how do you make sure that you’re constantly progressing without burning out? In simple terms, every good program is defined by training cycles. These are divided into macro-, meso- and microcycles. These are the periods of training defined by your goals, ensuring that you’ve got periods of progressive overload and periods of deloading, or recovery. Macrocycles define the longer periods to reach a goal, like losing a certain amount of weight in three months. Mesocycles are shorter periods of progressive overload and recovery, taking about four to eight weeks. Microcycles are your weekly routines defined by individual workouts.

Depending on your goals or training ability, these cycles, especially mesocycles will look very different. For those who are brand new to training and exercise, these training cycles can take a lot longer because their bodies adapt but also recover much faster, especially for the younger population. Intermediate and advanced athletes might have a four-week mesocycle with three weeks of overload and a week of deload because they tend to push their bodies much harder and need more recovery.

A good program will include well-defined mesocycle blocks within a larger macrocycle (e.g. 12-week transformation program) which ensures that you’re always progressing. You should still be doing the same exercises but with more reps, sets, or weight, or a combination of the three followed by a period of less load to ensure that you’re progressing and recovering effectively.

Keep the exercises the same during a mesocycle and track their progress instead of chopping and changing every week.

Consider stimulus vs fatigue

Stimulus to fatigue is a term popularized by Dr. Mike Israetel, a bodybuilder with a Ph.D. in Sport Physiology. Exercise is used to create a stimulus that will drive adaptation and performance but it will cause a certain amount of fatigue. Your goal is to get the most stimulus out of exercise without causing so much fatigue that you can’t recover before training again.

The relationship between these two variables is very important for progressing in your fitness journey. The better the stimulus, the more you will progress. However, if the stimulus causes so much fatigue that you can’t recover before your next training session, your progress will be negatively impacted. You also don’t want to have so little stimulus that you’re not driving any fatigue or adaptation. Fatigue is an important part of the process. You can look at this relationship from the perspective of the whole workout or even individual exercises.

Depending on your goals and training split, you want to recover from your overall workout by the time you reach that same workout or muscle group again. If you had an intense leg workout consisting of squats and accessories that fatigue the hamstrings, glutes and quads, you won’t be doing deadlifts for a couple of days. Both the squat and deadlift train large muscle groups but also fatigue the central nervous system in a big way.

You don’t just want to recover from your workouts, but you want exercises that have a great stimulus that causes a good amount of fatigue but not so much that you can’t continue the workout or recover before the next one. If you want to grow your legs, it might be tricky to continue the workout after many heavy squats, but if you had leg press or hack squats as your main multi-joint compound exercise, you have enough energy left to do more high-quality accessory exercises in the rest of the workout.

If you’re writing your program or talking to your coach, learning which exercises cause a good amount of stimulus with a good amount but not too much fatigue, you can find the exercises and workout split that gets you the best results.

This concept is at time complicated yet also simple, and can be expanded on in a much larger article, but not today.

Limit confusion

We only have so much time in the day to work out. If you don’t have a program that tells you exactly what to do, you can get confused and waste time. If you’re starting a good program, you can start lighter and get the hang of specific exercises. By the time you get to the last week of the mesocycle, you can push harder in the exercise to drive more stimulus into the muscle and recover effectively. If you’ve got a new exercise for the same workouts each time, you’ll be wasting time looking for new equipment you’re not used to using, learning the ropes, and not going heavy or intensely enough to drive that important stimulus.

All of this confusion will also cause frustration, making it less effective and you probably won’t stick to it after not seeing any results.

A well-written program with similar exercises in a mesocycle will provide you with a better stimulus-to-fatigue ratio while driving progressive overload. If you stay consistent with these important variables, you’ll have a better chance of getting the progress you’ve been working for.

6 Tips to help you improve your barbell squat

Tips on how to squat more effectively

Whether you start sport as a kid or enter the gym as an adult, you’re introduced to important exercises that stand above the rest. If it’s not doing push-ups or pull-ups, you’re told to do squats to improve your leg strength and size. Now, you should always start with bodyweight squats, but what’s next? When you start getting better, you get introduced to the barbell squat, but in many ways, it’s a different exercise. Novice lifters have so much information thrown at them from the start that they don’t particularly know where to begin in the first place. Even though there are many squat variations out there, we want to focus on the popular barbell squat.

Here are 6 areas of focus that will help you improve your barbell squat:

High-bar vs Low-bar Squat

High-bar and low-bar position squats are both legitimate ways of doing the movement, but it might just depend on your goals when choosing which one to use. It often comes down to more athletic sports like weightlifting and powerlifting, or if you’re focusing on muscle building and bodybuilding.

High-bar squat: The most common variation of the barbell squat, it is recognised by a bar sitting more on the traps just below the neck. Also, you will have a more upright torso, lower hips, and shoulder-width stance position. This variation has you squatting “ass to grass”, ensuring you’ve got a deep stretch in your quads, maximising muscle growth.

Because you’re resting the bar on your shoulders, you’re not using your arms to hold it up as much. The weight is lighter but you’re able to get more full range of motion reps without taxing your lower back. Other than being perfect for bodybuilders looking for big quads, the low bar squat is often used for more movement-intensive sports like Olympic lifting and sprinting.

High-bar vs Low-bar Squat

Low-bar squat: The low-bar squat is a more niche movement. It is often used by strongmen and powerlifters due to the ability to generate more strength from their squats. The bar position is on the posterior deltoids and spine of the scapula. It naturally gives the athlete a more horizontal torso position, hips pushed further back, and a wider stance. The movement generates more force from the posterior chain in the hamstrings and glute muscles but also has less strain on the knees due to the angle they are at the bottom of the movement as seen in this study from 1996.

If your goal is pure strength and power, like powerlifting, the low-bar squat is for you.

You can utilize both of these movements during a training program, but you have to choose which to use more often depending on your goals.

Elbow & Hand position

The position of your elbows and hands will link directly to the bar position you use during your squat. It also comes down to flexibility and mobility. Strongmen and powerlifters who use the low bar squat can be less mobile in their shoulders than other, more mobile athletes, purely due to their competitive events. So, during the set-up of the squat, their hands will be further apart to be able to get the bar into the lower position. However, their elbows will still be tucked in and under the bar as much as possible for stability.

When doing the high bar squat, it is easier to set up the elbows right underneath the bar, tucked into the lats with a narrower hand position. Athletes will find this position much easier to get into due to shoulder mobility and wider range of motion.

The walk-out

You want to stay as stable as possible when doing your squats. Taking too many steps out of the rack not only wastes energy but will destabelize the barbell on your shoulders and can hinder your brace.  When you’re about to lift an exceptionally heavier weight, you want to have confidence in your balance.

You want to take two large steps out of the rack. You can also do two and a half steps to adjust your stance if needed. This ensures efficiency and optimal balance for lifting.

Squat stance

Dialing in your squat is a process of trial and error, and the position of your feet is one of those tough decisions to make. The most basic thing to remember is that you want your thighs to follow the angle of your toes, but this can also change in some cases. It’s all about comfort in the ankles and hips. Here are 3 things you can do to help you get the right stance.

  • Your feet are flat on the floor.
  • Your hips are comfortable, i.e. no pinching or pressure). Find a position in which the hips move the most freely.
  • Each thigh is approximately parallel with the corresponding foot, if you look straight down from above one thigh, your foot is in line with it.
Woman doing squats with wide stance on white background
Finding your preferred squat stance is all about trial and error.

However, this can also change according to the type of squat you’re doing. Often, the lower the bar position, the wider the foot stance due to the more horizontal torso position to give more space. The wider foot position also helps with the leg drive which is activated by the more pronounced hip angle.

Squat speed

In recent years it has been studied and corroborated that using the slow essentric phase of the movement has the best stimulus for muscle growth. Slowing down the lowering phase of your squat and going as low as possible not only stretches your targeted muscles like the quads but increases time under tension. These factors can help you build bigger and stronger muscles with your squats.

Powerlifters on the other hand will lower themselves more quickly into the squat to use the rebound from their knees and hips to force themselves back up. However, moving too quickly can hinder strength and power.

The Force/Velocity relationship is a straightforward method of showing how two variables impact each other, and in this case, your squat speed versus power output. If you want to know more, you can check out this link here for more details. In short, it shows that the more speed you have, the less force you can generate in your squat. You don’t want to drop down into the squat so quickly that you lose balance or power in the second phase.

Squat depth

When doing the squat, the goal should always be to go as low as possible. Exceptions to the rule will be those who are brand new to the movement, those with an injury, or somebody with a disability that doesn’t allow them to go low enough. Getting a squat as low as possible is going to be much easier with the high-bar squat position.

With your foot position sorted, bracing correctly and a slow lowering phase, you want to squat so low that your hamstrings touch your calves if possible. It might take longer for some to get into this position with their back staying neutral and hips feeling comfortable, but progression is the aim of the day.

While doing full range of motion squats should be the goal for most people, especially starting or building the most muscle, there are exceptions. If you’re working towards power and doing the low bar squat in competition, the goal is to only have your hip crease below your knee cap.

These six tips to maximise your squat are mere suggestions but they provide a great starting point for those just starting. If you’re a more intermediate athlete, this might be the baseline to revert to if your squat isn’t progressing as much as you would like.

Improve your bench press with these helpful accessory exercises

Bench press accessories can boost your lifting potential

Whether you’re new to the gym or an intermediate to advanced lifter, you probably want a big bench press. However, with everybody having a different body shape and coaches having different approaches with loads of content out there, it can be hard to sift through it all. All of this content usually just tells you what the issue might be and how to fix it, but only when you’re already on the bench. 

Did you know that accessory exercises are more than just workout fillers? When building a program for something like the bench press, it’s not enough just to add movements after the main lift for the sake of it, but accessorise your program with movements that help you lift better. 

Here are seven sticking points and an accessory or two for each to help you get a bigger bench: 

Accessory exercises to improve your bench press

Accessory movements are those exercises that should help you stay injury-free but also help you get stronger. Getting stronger doesn’t mean that they need to be heavy or super high volume, but can be as simple as adding it to your warm-up.

Plant/Root your feet

When lifting, especially when lifting heavy, you want to be as stable as possible. A better bench press starts with good foot placement and making sure they’re not all over the place when pressing. Unless you’re doing Larson presses, you want your feet rooted to the floor. 

Because you’re about to drive with your legs, having your feet under your hips as much as possible is a great place to start. Make sure your heel and toes are planted to keep you connected and stable. 

Accessory Exercise: Ankle mobility

For most people, getting their feet planted under their hips is hindered by ankle mobility. As a warm-up, grab yourself a plyo box or bench, and place your foot on top as if you’re about to do a step-up. Instead of stepping up, lean forward so that your knee goes over your toes. As your heel lifts off of the bench, lightly force it back down as you breathe through the stretch. Do this for one or two sets of 30 seconds for each leg. 

Leg Drive

Yes, you’ll be using your legs during the bench press. If you have your feet planted, you’re already most of the way there. Using leg drive in the bench press is very different to squat or deadlift. Even though some people drive their hips to the sky like a glute bridge, one of my favourite ways to drive with my legs is to drive them along the floor toward my head and shoulders. 

When competing, you’re not allowed to have your butt lift off of the bench, so driving your hips to your head and shoulders could help. The technique will not only help keep your hips down but drive your traps into the bench and even improve your arch. 

Accessory Exercise: Bulgarian split-squat 

Everybody’s a least favourite exercise in recent times, adding the rear leg elevated split-squats to your warm-up can help you get the feeling of the correct leg drive. Usually, you’re focusing on the leg drive from the front leg to work on the glutes and hamstrings, but focusing on the stretch in the quads and hip flexors on the leg elevated behind you can help with your bench press. 

With the back leg balanced on your toes, drive through the back leg for a couple of reps and sets, teaching you to transfer the force through your body to the bar. 

Bracing

Bracing during any lift not only keeps your spine safe, but because of the tremendous pressure in your abdomen, you’ll be surprised how much more you can lift. 

How to brace

  • To breathe properly take a deep breath through your mouth with minimal chest expansion forcing air into your stomach and holding it, then brace your core muscles as if you are preparing to take a punch in the stomach.
  • Bracing is an all-around feeling, so if you’re tired after a run, place your hands on your obliques and feel them expand as well as your back muscles, expanding your whole trunk. 
  • If you’re an intermediate lifter and start wearing a belt, you need to feel the tension pushing into the belt all around. 

Accessory movement: Planks

Do your elbow planks and side planks. Not only will you learn to brace and hold in the right positions, but you’ll also learn to tense your entire body as part of the core bracing. Don’t just try and keep your body straight but dig your toes into the floor, brace your core, and tighten your shoulders as hard as you can for at least thirty seconds. 

Don’t neglect your abs, even if you’re not exercising for aesthetics.

Elbow position

You want as much of your body under the bar as possible when benching, including the elbows. As an easy rule, you want your elbows at a 45° angle, especially on the lowering phase. This position helps your arms stay connected to your lats, giving keeping that tension you’ve built. If your elbows flair out, you’ll notice an immediate decrease in power. 

Warm-up: Neutral grip dumbbell bench press

Close grip Dumbbell bench press: When lying on the bench with light dumbbells, have your palms facing each other instead of towards your legs. Slowly lowering the weights, imagine your triceps resting on your lats as you get into the full chest stretch. Press up explosively, using your triceps, chest, and lats. 

Accessory exercise: Close-grip bench press

A popular bench accessory where your hands are as narrow as possible (narrower than chest width), lower the bar slowly with your elbows staying close to your body and only press after the bar touches your chest. 

Gripping the bar

As we mentioned before, you want as much of your body under the bar as possible, including your wrists. If your wrist is bent too far back, you lose a lot of the tension and drive you’ve worked on so hard. 

Try placing your hand on the bar and then twisting your thumb into the bar. The bar will mostly be in contact with the padding under your thumb and pinky. Trying to death grip the bar will force your wrist back and put tension on the forearms while you try to focus on pressing.

Accessory Exercise: Finger curls

Hold onto a barbell hanging in front of you. Extend your fingers let the bar drop and curl the bar back up by flexing your fingers. 

The bench press grip is more for control instead of a death grip. 

Bar placement

When lowering the bar, we are often too worried about where exactly it should land. With everybody having different body shapes and arm lengths, there’s a spectrum. If your elbows are at the right angle and you’ve got your grip sorted, the bar will touch your chest where it needs to. A good range is somewhere near your nipple line and mid-to-upper chest. 

Accessory exercise: Inverted row

Inverted rows are a great mid-workout accessory. Setting up a bar in the rack at different heights can help you increase or decrease the difficulty. If your body is straight, even if your knees are bent can help you pull yourself to the bar. Where the bar touches your chest is often going to be where it lands during pressing. It’s also great for strengthening the back muscles in the same position you would be pressing. 

Training frequency

After deadlifts and squats, you often feel like a few days, if not a whole week, is necessary to recover from the workout due to much larger muscle recruitment and weight lifted. Your chest and arms have smaller muscles and the impact on your body is much less. That means that you can recover faster, and can train sooner. It’s time to ditch the “bro-split” and get some more chest training days into your program. 

Depending on how long you’ve been training, adding a second or even third chest workout can benefit you. 

How to increase bench press frequency

You don’t just want to jump into doing 3 bench press days a week. Start with adding an extra day about 2-3 days after your workout, especially if you don’t feel sore anymore. 

A common way to split two bench press days is by adding variations like doing one heavier day of conventional bench press and a lighter close-grip bench later in the week. If you’re just splitting 8 sets of bench presses into two workouts with 4 sets each, the volume isn’t going up and won’t help you. When splitting your workouts, add two working sets to each of them. 

Conclusion

There are many different cues and accessories to add more weight to your bench press. These are just a few easy accessories you can add before or during your workouts to help improve your pressing technique and strength. 

Finding out what works for you is always going to be more important than clear-cut advice, but this is a great place to start. 

How can women start feeling comfortable in the gym?

Group of women with confidence training together

The world of health, fitness, and well-being is supposed to be a non-judgemental place with support coming from all over, but we all know that it’s a falsehood. With anonymity due to social media feeds and a whole lot of misogyny, and bruised egos, women keep getting bullied for looking after themselves and being strong. We could expand on this topic but we would be here for days.

So, let’s band together and find ways women, especially beginners, can feel more comfortable in public fitness spaces, like gyms.

Spoil yourself with a gym outfit

Confidence starts with yourself and what often makes us feel confident is wearing something great. Whether you go alone or take your gym buddy with you, pick out some new gym outfits that you know will make you feel good.

Remember, it’s not how you look to others around you, but how you feel about yourself, and wearing something spectacular to you is a great start.

Find a gym buddy a.k.a. Accountability buddy

The gym can be a lonely place but having a friend with you can make a big difference. It’s easy to get distracted and feel self-conscious when you’re working out alone. But when you have a friend as a distraction, you won’t feel as judged as much as you “think” others are or as much as you judge yourself. The other plus-side is that they are going through the same workout as you.

“Being with someone you are comfortable with makes the experience less daunting and will provide an opportunity to build comradery and bond.” – Sarah Ezzideen

Women doing box jumps together
Having a friend to exercise with might be the best confidence-booster. Photo by Meghan Holmes on Unsplash

Not only do you have a friend going through it all at the same time but they can also help you get out of the house to go for a workout on those days you just don’t feel like it. An accountability buddy can also help you stick to your nutrition plan as much as the workout plan. This relationship becomes beneficial for both of you when it is your friend who needs some help.

Plan your workouts

When you’re in the gym and you don’t have a plan, you can start feeling self-conscious about what you need to do next. Feeling lost without a program not only makes you feel this way, but it’s also going to hinder progress.

In the digital age, there are countless apps and resources to find programs to train at home, minimalist gym equipment programs, or full-strength and muscle-building routines for when you start feeling more comfortable. If you’re getting even more confident in investing more time and money, a personal trainer can help you build a program specific to your goals and needs. Your new personal trainer can be in-person or online thanks to technology.

woman holding barbell with plates loaded while wearing fitness watch
Planning and tracking workouts can help you progress and feel more confident. Photo by Ambitious Studio* – Rick Barrett on Unsplash

These apps and videos can help you improve your form or help you learn about new equipment and exercises so that you don’t feel lost anymore.

Having a program can help you focus more on yourself and your self-confidence while also helping you make real progress which ends up helping with your confidence even more.

Headphones and tunes!

Music has a way of helping us get into the zone. Whether that’s to relax or feel confident in the gym.

When you’ve found or made a playlist of your favourite music, you can focus on it rather than what’s going on around you. Music helps you live in your own world, drowns out the rest, and can help you feel more confident. And if you get into the zone so much that you “bust a move” between sets, more power to you!

Don’t be afraid to ask for help

Almost everybody at the gym is going through the same thoughts as you. Almost everybody there is just trying to improve themselves and when they’ve been on the journey for a while, are always willing to give you some help.

women training together
Asking for help can provide you with knowledge and a lot more confidence in the long-term.

Whether you just want to find a machine, help with an exercise, or talk to a trainer, you’ll almost always find a friendly face who’s willing to help you. You might even find a new gym buddy in the process.

If you’re very shy, start by talking to gym staff and personal trainers. They’re there to help you.

Focus on positive self-talk

When your confidence is low, it can be easy to tell yourself some negative things, but what if you made an effort to turn them into positive statements?

Positive self-talk is a surprisingly powerful tool when you’re exercising. It can help you get out of bed, push yourself to do another rep, or celebrate small wins.

Practice positive self-talk and affirmations:

  • “I am strong, capable, and determined.”
  • “I believe in my ability to push through any challenge.”
  • “My body is powerful and resilient.”
  • “I am getting stronger with every workout.”
  • “I trust my body’s strength and endurance.”
  • “I am focused and committed to reaching my fitness goals.”
  • “Each exercise I do brings me closer to my ideal self.”
  • “I deserve to prioritize my health and wellbeing.”
  • “I embrace the process of growth and improvement.”
  • “I am proud of myself for showing up and putting in the effort.”
Woman tying running shoes while listening to music
Music not only adds positively to your workouts but provides you with a musical distraction. Photo by juan pablo rodriguez on Unsplash

Everybody had to start somewhere

If you realize that everybody has their journey, you can start focusing on your path and processes. You don’t even need to start in the gym or with structured workouts. You can go on walks, go cycling, join some outdoor training groups, etc.

You can even try all of them to find out what activity suits your personality and goals. If you focus on your goals while doing what you enjoy, you’ll find an ocean of confidence.

This article was written in-collaboration with qualified fitness experts Geek Physique and personal trainer, Sarah Ezzideen. You can find Sarah on Instagram HERE!

How can yoga improve your gym workouts?

Can yoga help improve your gym workouts

Multiple times a week, we get up and go to the gym, whether a commercial or private gym or in the garage. While some of us like building muscle, others work towards getting stronger. There are also those who like to get flexible and “centred” with yoga. But did you know that you can combine the chilled-out vibes of yoga to improve your weight training?

While yoga focuses on flexibility most of the time, it can also help you become better at lifting weights and building bigger muscles. It’s not just the physical adaptations that benefit from yoga; we have all heard about its mental benefits, too.

Mobility and flexibility

You don’t have to do the splits or touch your forehead to your toes, but some form of mobility and flexibility is always a good idea.

Flexibility is the ability of your muscles, tendons, and ligaments to extend into a wider range of motion, but statically. Mobility refers to your ability to move your body in a broader range of motion, and to be more dynamic. Everybody can be more mobile, especially when doing specific sports, but only some people need to be super flexible. Powerlifters don’t need to squat as low as Olympic lifters, and sprinters should be more mobile than distance runners.

Man doing warrior yoga pose under rocks at the ocean
You don’t need to do the splits for yoga to help with gym workouts. Photo by Dave Contreras on Unsplash

Yoga is often relatively static, but some versions allow you to move and become more mobile in those different poses. You can move from pose to pose before getting into those tricky static positions, but you don’t need to go to extremes with awkward and complicated poses. Find a good yoga routine or class once a week. You can become more mobile, even just a little bit, to improve your lifting range of motion because, in most cases, the muscle growth happens most when it’s in a lengthened position or stretching against an external load, also known as the essentric part of the movement.

Leaning into some mobility work through a yoga class can ensure you can perform better during workouts or competition.

Better breathing for workouts

Breathing keeps us alive, but did you know that the way you breathe during a workout can improve performance? Not only do you want to catch your breath between sets, but you also want to breathe properly while lifting those weights or brace your core before and during a big lift.

Yoga has specific breathing methods that can help you control your breath before, during, and after your workout to maximise your effort and help you recover while you’re not lifting. Suppose you’re lifting heavy weights, being able to breathe with your diaphragm, and holding that to brace is essential for better performance in the set. It’s essential to control all those muscles when you’re busy lifting to keep you safe and performing your best.

Man meditating on rocks
Practicing specific breathing skills can help with your workouts. Photo by Jaspinder Singh on Unsplash

Whether it’s an energising breath to wake you up before lifting, relaxing breaths between sets to lower the heart rate and get oxygen flowing again, or bracing or breathing during reps, yoga can teach you to control your breathing.

Improves focus and body-awareness

Along with the new breathing skills, you learn about focus. You’re not only focusing on your breathing while getting into and holding poses, but you’re learning to focus on yourself without distraction.

Breathing and internalising your focus means you can feel what your body is doing more accurately. You learn to focus on individual muscles and joints and how they operate together, giving you an advantage when training and competing.

Woman doing lat pulldown exercise
Internalized focus can help with improving individual lifts. Photo by FitNish Media on Unsplash

An extension of this internal focus can eventually teach you about the mind-muscle connection you often hear about.

You know when you’re squatting deep enough or discovering an imbalance while running so that you know what to work on in the future. You could even notice potential injuries before they happen.

Stress relief

For some of us. Lifting weights is our stress relief, but you’re still putting your body through its paces and providing it with a stress stimulus.

By joining a relaxed yoga class or doing a routine at home, you can focus on yourself, help loosen tight joints through movement, and relax your mind through breathing.

You get relaxing meditative yoga classes and routines, but if you love lifting weights, you might like to find power yoga classes, which are based on a form called Ashtanga yoga. Where Ashtanga yoga follows a particular routine, power yoga is an off-shoot which uses many of the same intense poses with a more dynamic routine and can be applied to specific patterns you want to work on.

You don’t need to do long yoga sessions or join a class every day, but the occasional routine can teach you about your body and how it can move without putting too much stress on yourself.

How to turn motivation into self-discipline

A man and a woman being disciplined with exercise

We’ve all been in the same spot at one time in our lives; that moment you realise that you want to change your life, and often it’s getting a bit fitter, losing weight or sometimes even signing up for something like a marathon. But we often say that we don’t have the motivation to train, however, it’s more about self-discipline instead.

Why are we making the distinction between motivation and self-discipline?

Motivation is the reason you’re signing up for the gym, race and/or training program. Self-discipline is your ability to continuously do something regardless of how you feel.

For most people it can be very difficult to stay consistent with what motivated them and the one thing that keeps us going to the gym, running club or studio on a weekly or daily basis is self-discipline.

So, how do you turn that original motivation into self-discipline? Here are some strategies you can use: 

Turn motivation into discipline

What’s your “why”? (and write it down)

Why do you want to make a change?

There are two versions of this, especially if it comes to weight-loss or living a healthier lifestyle.

The first is that moment you’re seeing yourself in the mirror and realising you want to feel more confident. For some dads, it’s the moment they realise that they’re becoming a father and want to be more active with the kids and family. These personal reasons can be a very strong motivator to help work towards your goals and then it’s down to discipline to continue.

The tougher version of this is when that motivation comes from outside, like somebody telling you to lose some weight, even if it’s a doctor but it can hurt a bit more from somebody close to you.  

Most of us react defensively to this outside source of criticism and those negative feelings can push us even further away from making healthier changes. But, you can still turn it into something positive if you find your internal reason and turn it into a positive future.

What’s going to stand in your way

How many temptations do you think you resist every day?

It can be very hard to know this from the start because we often react on a whim. However, you can watch your behaviour and start to discover these temptations, and then start to develop the self-awareness and self-discipline to combat them.

Woman looking in the mirror at the gym
You are the only person standing in your way to greatness. Photo: Scott Webb via Unsplash

As an example, use your shopping trip to the supermarket. Try and realise which aisles you spend more time in and what you’re grabbing from the shelf without thinking about it. Your self-awareness will realise that it might be the sweets or high-fat foods. You can then write it down and help yourself not to choose these options and instead find healthier snacks.

The same goes for the snooze button in the morning or endless scrolling on social media.

Try and discover your temptations, then write down how you’re going to combat it or replace it with a healthier habit.

Write down your goals

Writing down goals is one of the most important steps
If you don’t write down your goals, they’re only a dream. Photo via Glenn Carstens-Peters on Unsplash

Now that you’ve got your reasons for making healthier choices, discovered your temptations and know how you want to counteract them, it’s time to write down what you want to achieve.

You should try and keep your goals achievable, but challenging, but dividing them up into categories helps with this application.

Short-term goals: These can be as little as daily or weekly goals, up-to a month. e.g. having a workout two or three times a week, losing that tiny bit of weight or just skipping “that” aisle in the supermarket.

Medium-term goals: These goals can be for the next 3 months or so, which are often personal trainer or gym packages for a reason. This amount of time gives you the perfect opportunity to reach more significant goals which can then become a new healthier habit. This is when discipline will truly start showing its results.

Long term goal: This will be that initial weight-loss goal you set yourself or life goal that you want to achieve. It goes right at the top of the list, but each of your short- and medium-term goals will build up to this one.

When you don’t write down your goals, they’re only a dream.

Embrace discomfort

Changing your lifestyle and habits is never easy. It’s called getting out of your comfort zone for a reason and self-discipline is strengthened through embracing it. That willpower is something you can actually work on.

By viewing self-discipline as an unlimited resource, participants were able to exercise the same degree of willpower after a depleting task as before it, demonstrating the impact our beliefs can have on our actions (Job et al., 2013).

You can do the same by NOT viewing self-control as a depletable resource might give us some of the motivation we need to overcome these hurdles, and our ego.

Staying disciplined running uphill
Embracing discomfort is a major part of staying disciplined. Photo via Jenny Hill on Unsplash

Build new habits

“The key to building lasting habits is focusing on creating a new identity first.” – by James Clear Goal setting, Habits and Self-improvement

You want to start with your goals and making them nice and specific so that you have a map of where to go. Now, you need the process of how you’re going to achieve these outcomes, like going to the gym or not ordering high-calorie junk food to lose those kilos on your goal board.

Finally, you want to change your world view and beliefs in what you’re doing and why. With this new identity, you want to become that person who makes healthier choices, walks more or writes a certain amount of pages a day.

Your process will help you reach your new identity, like adding steps to each daily walk or writing 100 extra words per day.

You want to become the person that reaches these goals instead of it just being something you do.

Use Technology

tying running shoes and using a fitness tracker
Embrace the new age of technology to improve your discipline. Photo via Onur Binay on Unsplash

In a world full of technological advances, we often feel disconnected and want to unplug, but technology can help you keep track of your progress and goals.

You have loads of fitness apps to track workouts, hire coaches and even get free workouts or walk trackers. You have apps that help you track your food and water intake too, linking to the fitness app if they don’t do both.

There are even goal setting apps that just help you write down your goals or track your habits.

Embrace technology, because you’re well-being is literally at your fingertips.

Learn to forgive yourself

Changing your habits and identity to make better choices is tough, especially with so many distractions, like festive season feasting. But, that doesn’t mean that you can’t enjoy it with everybody.

You need to learn to forgive yourself instead of feeling guilty and punishing slips in judgement or indulgence like those sweet treats over the holidays.

A good example is that when you’ve had your day of Christmas feasting, remind yourself that it’s just been a day and continue with your healthy path on the next. Don’t starve yourself or try and “work it off” but continue the good habits you’ve worked so hard on.

Getting motivated is easy while building discipline is the hard part, but it doesn’t need to be. Using these tips, you can become more self-disciplined and reach all of your goals.

Sources:

  • 17 Self-Discipline Exercises to Help Build Self-Control on  7 Feb 2020 by Catherine Moore, Psychologist, MBA
  • Job, V., Walton, G. M., Bernecker, K., & Dweck, C. S. (2013). Beliefs about willpower determine the impact of glucose on self-control. Proceedings of the National Academy of Sciences of the United States of America, 110(37), 14837–14842.
  • Identity-Based Habits: How to Actually Stick to Your Goals This Year by James Clear Goal setting, Habits and Self-improvement

How sport helped me overcome impossible hurdles

How sport helped me overcome impossible hurdles

There are countless movies about sporting heroes, fictional and real life, that overcome adversity. Books have been written about legends of their respective games that came from nothing to make something of themselves. This is NOT one of those stories, but one of somebody just finding their way, and it all started with some sport at school and how exercise helped overcome some hurdles to be just a little bit more independent.

Having been born with a visual impairment that left me legally blind and a doctor telling my parents that I would never read or write left quite a bumpy road ahead. With a mother who overcame the hurdles on her side and pushed me to do more than feel sorry for myself, and a school specially made for visually impaired people, there was a start but it was slow. I was never the tallest and a little bit chubby, while in boarding school for most of the week and there weren’t that many options for physical activity in a school for kids with visual impairments. These factors made it hard for somebody who ate like they hadn’t eaten all day (even though I did) to stay healthy and deal with fat-shaming because nobody could be shamed for their disabilities. After all, everybody was disabled.

I was always a fan of sports, especially cricket and rugby, but my school did not have them, not even blind cricket. The school did have a grass running track like most schools would but it also had a 25m Olympic-style laned swimming pool. We had the usual annual inter-school athletics meets but I never knew you could do more so it was only when I was about fifteen that I just started joining my fitter friends on the running track when it wasn’t even athletics season anymore.

I enjoyed having something to do in the afternoon, having mini competitions with my friends on the track and the bug got me. Not only did I develop a competitiveness to do better than they or I did, but I saw my body change and become stronger. Now, we know the way you look is the least important thing in life but when you’ve got low self-confidence, seeing those little changes makes you feel better.

Now, we can go on about how I somehow got into Stellenbosch University and eventually got my degree in Sport Science where I learned bout everything the body does to be better. I made friends who taught me how to lift weights and lessons that taught me more about the different sports I loved but knew little about. However, we want to know how sport and exercise helped me reach for more rather than sit around and say that I can’t do that one thing or exclude myself from living a more independent life.

Self-confidence

At the most basic level, sports can boost your self-confidence to heights you can barely imagine. It can be as basic as seeing changes in your body and feeling better about how you look in a mirror. But, with myself, I was seeing changes in my performance. Realizing that putting in hard work that was also fun provided me with confidence when I saw the running times go down and the weight I lifted increase. Not every person needs to be a world-class athlete but whether it’s in the gym or just going for a run and going a bit faster, those small wins made me feel more confident and made me work harder to get better next time.

Personally, looking good made me feel confident, but that was in the beginning.  The confidence I got through exercise made me more comfortable to step outside of the disability box I put myself in and try new things in the outside world like going to university on my own, building friendships out of nowhere, trying different types of sports and even karting, which somebody with my eyesight probably wouldn’t usually attempt.

Discipline

My friends motivating me to start running with them was how it all began but exercise is a great, if not the best, way to build discipline. When you start seeing the small changes in your body and performance, you want to do a little bit better each time. Through the constant work on myself, I learned about what discipline was and how when I kept showing up to the gym or work, I would achieve my goals more consistently.

Showing up and putting the work in every day whether I wanted to or not became a habit so, it doesn’t feel like work anymore and I can just keep moving forward and build on what I did the day or week before. You don’t have to wake up at 4 am every morning to go to the gym or sit at your desk, but having some form of routine will help you build discipline.

I used my confidence and discipline to set new goals like going out further into the world, including running long distances on the road without any assistance. I used it to build a career in industries myself and my parents were told would never be possible.

Goal-setting

For most of us, work is not what we want to do during the day, but if we turn it into a bit of competition with ourselves, we can get through it more easily.

Setting goals in the gym while following a program taught me how to set goals for the workday as well. We can all write our day’s jobs into our diaries but what about setting goals similar to our workouts? Being able to do a specific job in less time isn’t a top priority but setting the goal of having fewer errors for a piece of work will automatically make it more efficient. It can even be as simple as finishing longer tasks before shorter ones later in the day when your focus tends to dwindle.

Set goals at work like you would in the day’s workout or training session, and you might see changes coming.

Making unlikely friends

Whether watching a game with friends, being part of a team, or running a race, I’ve met all kinds of people.  I met people to nerd out with when it came to our favorite sport and got to train, and compete, with all kinds of amateur and professional athletes. I even got to write about training for a World’s Strongest Man finalist and Britain’s Strongest Man when the world was falling apart in 2020/21.

Sport has taught me that disabilities don’t matter because as long as you’re doing something to do better, you’ll always have people around who support you, and provide unlikely opportunities.

Along with a strong family behind me who never let me do less than I was capable of and getting my sweat on a couple of times a week, I learned lessons to carry with me for my entire life to come. It helped me become more confident and disciplined, helped me make friends, and gave me a career that some would have thought impossible from the day I was born.